Wednesday, October 31, 2012

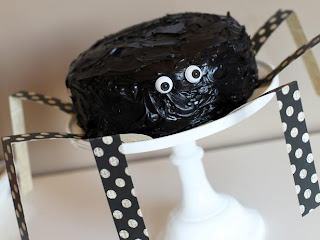
Spider Cake!

Spider Cake

For this cake you'll need:
1) Chocolate cake mix
2) Two cans of chocolate frosting
3) Black icing color
4) 9" cake pans
5) Candy eyes or doll eyes, decorative paper for the legs, double-sided tap
6) White pedestal cake stand

Bake the Cake and Prep the Platter

Bake cake in two 9" cake pans as directed.  While the cake is baking, cut 8--- 10-1/2" x 1-1/4 " strips of decorative paper (black with polka dots is shown above) for the spider's legs.  Fold the strips in half. Using double-sided tape, attach the ends to the cake stand. Fold the legs toward the middle of the cake stand to give them height.


First Layer

Place first layer of cake on the cake stand with the flat side down.

Make Black Frosting

Add small amounts of black icing color to the frosting until desired color.  Then, spread a layer of frosting on the first layer of cake.

Add the Second Layer

Place the second layer of cake on top of the iced layer, with the flat side down.

Frost the Entire Cake

Cover the entire cake with the black chocolate frosting.  Add candy eyes or you doll eyes from the craft store can also be used.


By~Kristin Chykirda
Saturday, October 27, 2012

Styrofoam Tombstones


Halloween is coming up so time to make you’re house look spooky with some home made lawn ornaments, the classic tombstone. Everyone usually has some Styrofoam laying around in the attic or garage in the TV or computer box so time to put them to use.

Here’s what you need:

  •  Styrofoam big enough to cut out a tombstone shape
  •  Carbon paper
  •  Monster mud with brush
  •  Latex Gloves
  •  Ballpoint pen
  •  X-acto knife


Step 1

Using a pen draw out the tombstone size on the sheet of Styrofoam and cut it out with the scissors or a knife.

Step 2

The next step is to draw out the design and write the epitaph on the carbon paper. Get creative and draw some skulls or angel wings! Once this is done lay it on top of the Styrofoam and trace over the design with the ballpoint pen.  

Step 3

Using the x-acto knife create cuts and cracks on the tombstone. This will give it a spookier and old look just like the real thing. If you have a soldering iron you can use that to melt the Styrofoam around the designs but be careful.

Step 4

Now with the monster mud, which is a mixture of drywall, compound and a dark color water based paint your going to spread it throughout the tombstone. This will give it the cement look. After the first layer dries you can use a paintbrush and paint within in the cracks and lettering with a darker paint to make it more visible. 

By Nidhin Vidyasagar


Thursday, October 25, 2012

Yarn Pumpkin Craft


Real pumpkins only last for a short amount of time and can be expensive to purchase.  And finding a  'perfect' pumpkin  can be even more challenging. Here is fun craft idea, that is easy to do and doesn't cost much, and will have life span much longer than a real pumpkin.

Supplies needed:
- Yarn of your choice ( A thick yarn may be best, because it is easier to cover the surface)
- Hot glue
- Roll of jute twine
- Hurricane glass in a pumpkin-like shape (This may be difficult to find, but can be found at TJ Maxx, this type of glass shape works best, because there is a hole in the top and bottom)

1) Start by tying the end of yarn through the side of the glass, and knotting it to secure.

2)Then wrap, wrap, and wrapped some more! Use a little hot glue as, to make sure it stays in place To wrap the entire pumpkin takes about an hour.

3)  To create the "stem" take a roll of jute twine, and just slipped it into the center.

By Kristin Chykirda

Wednesday, October 24, 2012

Pumpkin Candle Holders


 Things you will need 
-small pumpkins
-paring knife
-ribbon or string
-small candles or container wax and pre-tabbed wicks. 
           Fist cut the top of the pumpkins and empty the pumpkins of everything inside, it is important that the pumpkin is completely empty to prevent a fire hazard.
            Second poke two holes on the sides of the pumpkin, third put the ribbons though the hole and tie the ends of it. Make sure the ribbon is at least seven inches away from the flame. 
           The last thing you need to do is put in your candle. You can pour wax in and put a wick in it or you can use store bought candles that can fit in the pumpkins. 
-By Danny Mounce

Saturday, October 20, 2012

Having a Halloween Party? Impress everyone with a Pumpkin Keg!


Everyone has the typical skeleton and cobweb decorations at a Halloween party but make you’re party more festive with a pumpkin keg. Don’t freak out thinking this is going to be difficult because its not especially if you’ve carved a pumpkin before. 

What you need …

  • A pumpkin (bigger the better; more beer!)

  • Alcohol


First you want to cut open the top of the pumpkin and clean out the seeds as if you are about to carve a pumpkin. Its important you get the seeds out so it doesn’t block the spigot when filling up a drink.

Next you want to cut a hole to place the spigot. You can use a pencil to draw the circle before you start cutting. Best spot is towards the bottom not to high up on the pumpkin so the beer can come out easier. Place the spigot against the pumpkin and trace the circle but make sure you to cut it a little bit smaller. With a smaller circle you have to dig the spigot into the pumpkin making it nice and secure. Apply the washer on the other side of the tap and your done with the hardest part! Now fill it up with you’re favorite beer and let the fun begin.


By Nidhin Vidyasagar


Wednesday, October 17, 2012

Studded iPhone Case


Things you will need are ½ tree spikes and a silicone iPhone case. The spikes used are the easy to use you just screw them on. The spikes you can get at Hot Topic or you can buy them online. The case can be bought online or anywhere cellphone cases are sold.
 Step one thing you want to do is line up the studs the way you want them to be on the case, make sure they are spaced evenly. Step two use a pen or marker to mark the case where the studs were. Step three cut holes into the case with a needle; use a wine bottle opener to make the holes bigger. Step four push the screws through the hole and screw the studs on, you can use a screwdriver to make sure the studs are on tight.

Post by Danny Mounce

Tuesday, October 16, 2012

DIY Glitter Phone Charger

We all get new phones, faster internet speed, more apps, and a cool new phone case.  But what about the phone charger?  Let's face it phone chargers can be boring and phone company's never give us options to get a phone charger that is out of the ordinary.  I think especially for girls, we always want our accessories to "Sparkle" or just be different from the plain and boring.  Here is a fun, easy way, to add some life to your phone charger.


What you need:

-Mod Podge (Glue)

-Paint brush (to use with Mod Podge)

-Pink glitter (you can use any color of your choice)

-Clear nail polish

-Cardboard/poster board (to use as your work station— you don’t want glitter on your floor 

or desk!)

-Phone charger


First- Paint the Mod Podge on the area you want glittered on the charger.  Do one side at a  

time so you can let each layer of glitter dry after applying.


Second- Sprinkle some glitter on your work surface.  Press the side of the charger with 

Mod Podge applied on it down on the glitter.  The sides of the charger are harder to cover, 

you may need to  apply Mod Podge and sprinkle the glitter directly on the charger.  Then 

dust excess glitter off with your fingertip lightly.


Third- Glitter can also be applied to the USB end and an iPhone plug-in if you have an 

iPhone.  Use the same method that was used for the wall outlet block of the charger.  Try not 

to get glitter in the little nooks and crannies of the USB end, etc. You don’t want glitter 

getting stuck in your phone or computer port. 


Last- After you've applied the glitter, use a clear nail polish to seal the work. Use a couple 

of layers to really secure it, letting each layer dry completely in between coats. 


Now you have a fabulous new phone charger and will stand out from the rest.  This is a great 

DIY project that can be done anytime for a great price! Enjoy!


By- Kristin Chykirda


Saturday, October 13, 2012

Applying a Screen Protector? Try the Hinge Method

We have all attempted to install a screen protector on a cell phone and 9 out of 10 times it’s a total fail. There are too many bubbles or somehow dust and hair got trapped underneath.  For some people the protector applied itself sideways and covered the camera or home button. Well next time give ‘The Hinge Method’ a shot developed by YouTube user minh8080! All you need for this DIY project is a screen protector, scotch tape or painting tape, and a credit card. Before you remove the back film that exposes the adhesive side of the protector you want to you place it on top of your phone/tablet and line it up perfectly. Take two pieces of tape and tape one side of the phone just like a door hinge.


 Now you can open and close the screen protector similar to a door. Now we remove the back film that exposes the adhesive side and slowly close it on top of the phones screen like your closing a door. As you close it you want to push down on the screen protector as it makes contact with the cell phone screen pushing out any air bubbles. Make sure you are doing all this in a dust free environment. Some people like to make a dust free environment in their bathroom by running a hot shower with the fan off and door closed, turn of the shower off and wait ten minutes. As the steam settles it pull down dust with it. Practice makes perfect, if you don’t get it right the first time try again! Checkout the YouTube video! The Hinge Method

 Posted By : Nidhin Vidyasagar

Monday, October 8, 2012

Welcome!!!


Welcome everyone to an easy way to find great ideas for a Do it yourself (DIY) projects anywhere. Whether your stuck at home or bored at the office, this blog will give you inspiration to try different things with household products or items you can find at your local store. So get off the couch and check out our blog ,try new projects and be creative! We decided to make this blog to show how you can get your moneys worth with the usual boring items laying around your house. So take a look, pick a project and get started!

- Nidhin Vidyasagar, Kristin Chykirda, and Danny Mounce