Thursday, November 15, 2012

Pumpkin Pie White Hot Chocolate

Some of us may not look forward to the cold, but we all look forward to some type of drink to warm us up. Going out to get a fancy drink can become expensive and may not always be made the way you prefer.  Yes, we have the option of buying those latte brewers, but those can become hassle.  A great alternative to all this madness is a home recipe to make your own pumpkin pie hot chocolate.  This recipe can be made at any time, and can be served to guests during a holiday gathering, or even just to warm up on a cold night.


Pumpkin and white chocolate is an wonderful flavor combination and when used in a hot chocolate can keep you warm and great for everyone in your family to enjoy.

Servings: makes 4 servings

Prep Time: 5 minutes
Cook Time: 5 minutes
Total Time: 10 minutes


Ingredients
  • 3 cups whole milk
  • 1 cup pumpkin puree
  • 1/2 teaspoon cinnamon
  • 1/4 teaspoon ginger
  • 1/8 teaspoon cloves
  • 1/8 teaspoon nutmeg
  • 1 teaspoon vanilla
  • 4 ounces white chocolate, roughly chopped
  • Pinch-of-salt
Directions

1. Heat the milk, pumpkin puree, spices and vanilla in a sauce pan until it just starts to simmer and   remove form heat.

2. Add the chocolate and stir until it has melted.
3. Pour into mugs and top with whipped cream and garnish with cinnamon.


With a few ingredients that can commonly be found in your fridge or pantry, this is a treat your whole family can enjoy.  By doing this simple recipe at home this gives you the opportunity to add more or use less of, to get the exact taste you are craving.  Shock your guests by serving this homemade pumpkin pie white hot chocolate, and have them asking for refills.  Try this at your next holiday party, or even just went gathering with friends.

By~Kristin Chykirda

Tuesday, November 13, 2012

Chocolate and Peanut Butter Acorns


Things you will need:
-Nutter Butters (bite size)
-mini chocolate chips
-Hershey’s kisses


First melt ½ a bag of mini chocolate chips in the microwave for at least 5 seconds and stir the chocolate.
            Second dip the flat end of the Hershey’s kiss into the melted chocolate and top with a Nutter Butter.
            Third dip the flat end of the mini chocolate chip into the melted chocolate and stick it to the other end of the Nutter Butter. Then let it sit and dry.
 *note if people have a peanut allergy you can use Ritz Bitz instead of Nutter Butters.
- post by Danny Mounce

Monday, November 12, 2012

DIY Laundry Kit

After a storm hits, besides dealing with no power, we also are unable to do laundry.  Having clean clothes is something everyone loves, but when there is no power, washing clothes can become a problem.  Going to a laundry-mat is also an option, but what if you are unable to get there?  This DIY laundry kit will come in handy if you loose power or are unable to get to a laundry-mat.  This kit may appear to be time consuming, but is a great alternative to washing your clothes.


These are the items that will be needed to wash your clothes if power is lost or maybe if your washer and dryer broke.
Supplies Needed:
  • 5-gallon bucket with lid (cut hole in middle of lid for plunger handle to fit through)
  • Toilet plunger (obviously a new one
  • Store in bucket:
  • Liquid laundry detergent
  • Stain remover/stain stick
  • Vinegar (add 1/2 cup to rinse water) helps remove soap
  • Rope (for clothes line)
  • Clothes pins

To Use:
  1. Empty contents of bucket.
  2. Place water, small amount of detergent, and clothes in bucket.
  3. Move plunger up and down for a few minutes or until clothes are clean.
  4. Remove soapy clothes and ring them out.
  5. Dump out soapy water (on your garden or lawn.)
  6. Place soapy clothes in bucket and fill with clear, clean water.
  7. Add 1/2 cup vinegar to rinse water.
  8. Move plunger up and down to rinse clothing.
  9. Wring out clothes and hang to dry.

Conserving water is important.  To conserve water in this case, use the same rinse water for the next load of laundry.  You can also store two 5-gallon buckets, (stack one inside the other to save space).  Depending on how dirty the clothes are, you may able to wash and rinse a few loads of laundry without changing the soapy water.  Clean clothes is something that is important to everyone, especially when we are unable to wash our clothes in our own home, or unable to get to a laundry-mat.  By preparing ahead of time with this DIY laundry kit, the loss of power and not being able to use the washer and dryer this kit will come in handy for anyone and is simple enough to use.

By~ Kristin Chykirda

Sunday, November 11, 2012

Thanksgiving Dinner Place Cards


                Thanksgiving dinner is right around the corner so here is a cool festive DIY to impress your friends. Give your entire guest a proper spot at dinner with these neat pine cone card holders. This will make your guests feel special and will add your personal touch to the table. 

What you need


  • Pine cones – go out and collect them or buy a bag from a flower market or craft store

  • Sharp Knife or saw

  •  Cards for names


Step One
Set the pine cone down on a flat surface and stand it up straight 

Step Two
Using a knife or hack saw cut down a slit 3/4” down the middle of the pine cone

Step Three
Fill out the names of your guest on the cards and insert them in the slot you just cut in the pine cone and your done! 


- By Nidhin V 

Monday, November 5, 2012

Halloween Paper Lanterns


            Things you will need:
            -round paper lanterns
            -black paper
            -scissors
            -hole puncher
            - small black bards
            -tape
            -hanging bulb fixture


            First thing you do is draw out the shapes you want spiders, ghosts, witches, etc., on black paper. You may want to trace the pictures for accuracy. Then you want to cut them out with a scissor. If you want to add red color to the shapes, cut holes for the eyes or other shapes then tape red tissue paper on the other side.
            Second punch a small hole through the shapes and slip the legs of the bard through the hole and attach the shape to the outside of the lantern by poking a hole through the lantern and spreading the legs of the bard. The last thing you need to do it insert a hanging bulb style fixture. 
-By Danny Mounce

Sunday, November 4, 2012

Lost Power ???

Hurricane Sandy has had a tremendous impact on the east coast leaving thousands of house powerless and damaged. Hopefully we can learn from this event and now better prepare in case of another natural disaster. My laptop only has 10% battery due to power lost in the neighbor hood but here's a cool DIY a family member showed me! Instead of lighting candles throughout the house my uncle took some flashlights and taped it to empty milk cartons filled with water which worked pretty well! So next time you lose power give this one a try. Hope everyone is safe!


- Nidhin V

Wednesday, October 31, 2012

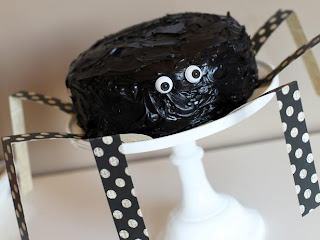
Spider Cake!

Spider Cake

For this cake you'll need:
1) Chocolate cake mix
2) Two cans of chocolate frosting
3) Black icing color
4) 9" cake pans
5) Candy eyes or doll eyes, decorative paper for the legs, double-sided tap
6) White pedestal cake stand

Bake the Cake and Prep the Platter

Bake cake in two 9" cake pans as directed.  While the cake is baking, cut 8--- 10-1/2" x 1-1/4 " strips of decorative paper (black with polka dots is shown above) for the spider's legs.  Fold the strips in half. Using double-sided tape, attach the ends to the cake stand. Fold the legs toward the middle of the cake stand to give them height.


First Layer

Place first layer of cake on the cake stand with the flat side down.

Make Black Frosting

Add small amounts of black icing color to the frosting until desired color.  Then, spread a layer of frosting on the first layer of cake.

Add the Second Layer

Place the second layer of cake on top of the iced layer, with the flat side down.

Frost the Entire Cake

Cover the entire cake with the black chocolate frosting.  Add candy eyes or you doll eyes from the craft store can also be used.


By~Kristin Chykirda

Saturday, October 27, 2012

Styrofoam Tombstones


Halloween is coming up so time to make you’re house look spooky with some home made lawn ornaments, the classic tombstone. Everyone usually has some Styrofoam laying around in the attic or garage in the TV or computer box so time to put them to use.

Here’s what you need:

  •  Styrofoam big enough to cut out a tombstone shape
  •  Carbon paper
  •  Monster mud with brush
  •  Latex Gloves
  •  Ballpoint pen
  •  X-acto knife


Step 1

Using a pen draw out the tombstone size on the sheet of Styrofoam and cut it out with the scissors or a knife.

Step 2

The next step is to draw out the design and write the epitaph on the carbon paper. Get creative and draw some skulls or angel wings! Once this is done lay it on top of the Styrofoam and trace over the design with the ballpoint pen.  

Step 3

Using the x-acto knife create cuts and cracks on the tombstone. This will give it a spookier and old look just like the real thing. If you have a soldering iron you can use that to melt the Styrofoam around the designs but be careful.

Step 4

Now with the monster mud, which is a mixture of drywall, compound and a dark color water based paint your going to spread it throughout the tombstone. This will give it the cement look. After the first layer dries you can use a paintbrush and paint within in the cracks and lettering with a darker paint to make it more visible. 

By Nidhin Vidyasagar


Thursday, October 25, 2012

Yarn Pumpkin Craft


Real pumpkins only last for a short amount of time and can be expensive to purchase.  And finding a  'perfect' pumpkin  can be even more challenging. Here is fun craft idea, that is easy to do and doesn't cost much, and will have life span much longer than a real pumpkin.

Supplies needed:
- Yarn of your choice ( A thick yarn may be best, because it is easier to cover the surface)
- Hot glue
- Roll of jute twine
- Hurricane glass in a pumpkin-like shape (This may be difficult to find, but can be found at TJ Maxx, this type of glass shape works best, because there is a hole in the top and bottom)

1) Start by tying the end of yarn through the side of the glass, and knotting it to secure.

2)Then wrap, wrap, and wrapped some more! Use a little hot glue as, to make sure it stays in place To wrap the entire pumpkin takes about an hour.

3)  To create the "stem" take a roll of jute twine, and just slipped it into the center.

By Kristin Chykirda

Wednesday, October 24, 2012

Pumpkin Candle Holders


 Things you will need 
-small pumpkins
-paring knife
-ribbon or string
-small candles or container wax and pre-tabbed wicks. 
           Fist cut the top of the pumpkins and empty the pumpkins of everything inside, it is important that the pumpkin is completely empty to prevent a fire hazard.
            Second poke two holes on the sides of the pumpkin, third put the ribbons though the hole and tie the ends of it. Make sure the ribbon is at least seven inches away from the flame. 
           The last thing you need to do is put in your candle. You can pour wax in and put a wick in it or you can use store bought candles that can fit in the pumpkins. 
-By Danny Mounce